
Creating a new member profile
1. Go to the member section in the Admin Dashboard
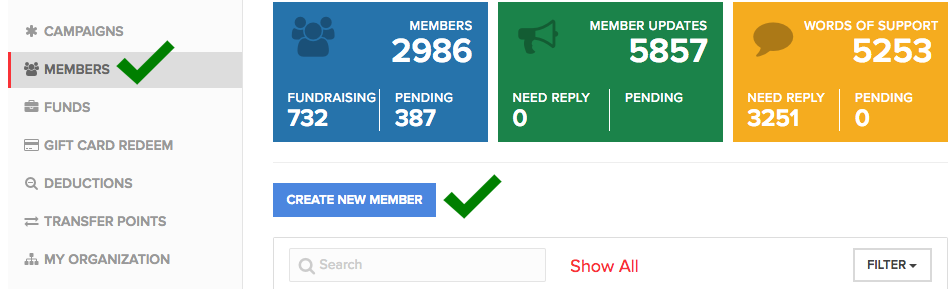
Log in at https://handup.org/admin/members -or- if already logged in, select 'members' from the left menu
Then, click the blue button above the search bar that says "Create new member"
NOTE: if the button says "create new campaign" you are in the wrong place & will need to click 'members' section in the left side menu.
A pop up will appear where you can proceed to enter the Members full name and contact information.
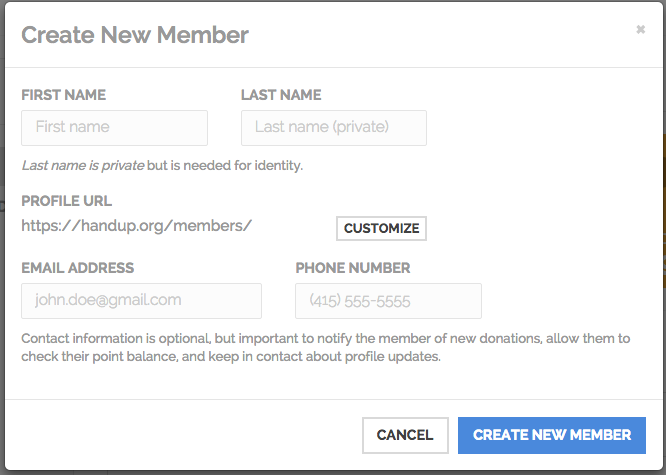
- The members last name will never be displayed publicly.
- We do accept alias first names if the participant wishes to maintain their privacy.
Next, it will display the users unique URL based on the first name entered. This URL is what will be publicly shared to attract donors to the member's profile. If you choose to order business cards for the member, they will also have this URL printed on them. If they want to customize this just click the "Customize" button.
Finally, it will ask for the contact info. We understand that not everyone has contact information but we highly recommend putting contact information when applicable. This way when a donation comes in the user will be notified and/or any kind messages or words of support will be sent directly to their phone or email.
When you are done click the "Create new member" button at the bottom of the pop-up.
2. Set what the member is fundraising for on HandUp
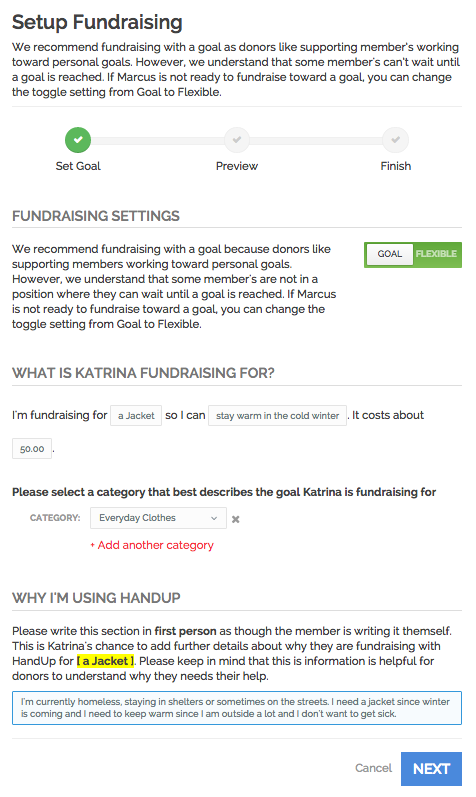
Complete the mad libs-style heading for the member's profile. This will appear as a header at the top of the member's public profile page, so make sure it's well written and concise.
Next, you'll fill out a description of why the member is fundraising for this need on HandUp. The content written here is often the first thing the donors read on the profile so be sure it is well written and compelling. Add more details about why the item or service is needed in their life right now, and how it will help them reach their longer-term goals.
Once you're done, click "Next" and you'll be shown a preview of what their profile will look like. Click "Back" to edit, or "Next" if it looks good to go.
For more detailed overview & tips for setting up a goal, see: Fundraising Settings - Setting Up A Goal
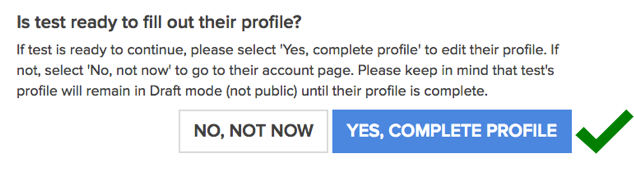
3. Complete the rest of their public profile.
Now click "yes, complete profile" to fill out the rest of the profile:
Go through each tab in this section and fill out necessary fields:
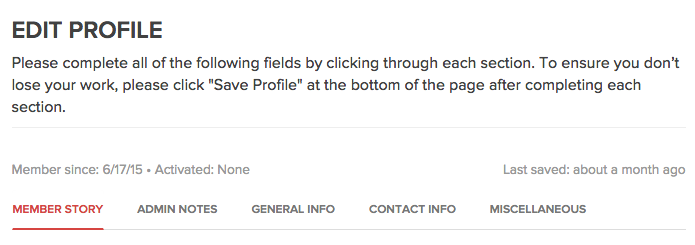
Member Story
This is the most important section where you will tell the members story this section includes:
About Me: This is where you will tell a little background about the person such as where they are from, what brought them to this city, what their work experience is, if they have kids or spouse etc.
My Backstory: This is where you want to highlight how they got into their current situation. We understand this part is sometimes hard to draw out but it's important to keep in mind donors want to understand the situation and are more compelled to donate when they have this information.
My goals, moving forward: This is where you can tell your donors about goals in life that their working toward. You can plans or steps they are taking to move forward.
Other things I'd like to share about my self: This is where you can highlight the members hobbies, things that make them happy, their proudest moments, or anything else they'd like to share about themselves.
See worksheet here if you'd like to allow member to write out their story in their own words.
Admin Notes
Use this section to list any private information or special needs you would like to note but want to keep private.
General Info
Some basic info on the member is required, this is where you can upload the users picture, and some basic location details.
Contact Info
We highly recommend entering contact info for the member. This is how we notify them when they receive a donation and any words of support. It is also a way the members can stay engaged in the platform as well as your services and know they have people supporting their goals.
Notifications will be sent by text and/or email based on the contact you enter.
Miscellaneous
Status: Here you can easily change the status of the profile by selecting an option from the dropdown. For more information on the different profile statuses, read this help article
Security Question: Please answer ONE security question. This is used to verify the member’s identity. Best to pick something very easy to remember.
Living situation: This is for data tracking purposes only and will not be publicly visible anywhere.
Primary Case Manager: The individual selected will receive an email notification when the member reaches their goal.
Signed HandUp Waiver: A signed waiver is required for participation, and you cannot activate a profile unless this box is checked indicating that the member has signed the waiver. We go by the honor system and trust that you have in fact gone over and signed the release waiver, the physical waiver can go in the client's file where you keep any other program related documents.
The waiver is available for download at the bottom of this article.
Complete Profile & Turn ON
Once all the above information has been entered click “Save Profile”.
To turn on the profile go to the Misc. Tab and set their status to “Active” and then “Save Profile” one last time.
Show them their public profile by clicking the red link in the top left corner " View Public Profile" and give them a chance to review it.
Member business cards
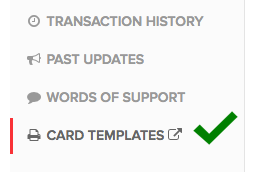
Once you have completed the profile you can print out cards that include the members profile link so they can promote their profile. Click "card templates" in the bottom left corner to get their personalized template.
Comments
0 comments
Please sign in to leave a comment.